
Knowledge Graphs in Python
Data Science Project
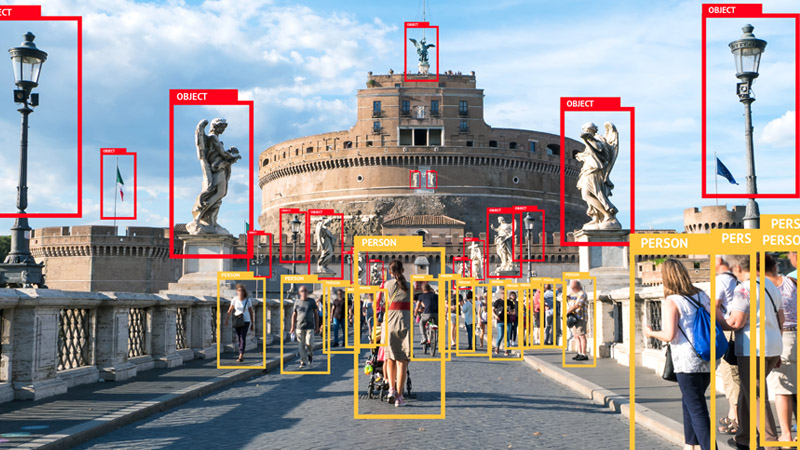
Data is one of the most important parts of machine learning, the available data can tell you how the model will generalize over a task if it will have any biases and if it will fail with some specific data, in computer vision the data used is mostly images (the vision part). Sometimes you want to train a new model on data that is not available on the internet, for example, a model to classify the faces of people you know, in that case, a new dataset has to be created with those faces, however, in some instances, the target is an object that you don’t have data for and need to create a dataset to train a model to recognize it.
Creating computer vision datasets is not a very hard task, many applications make the process very easy and simply make the task about drawing boxes, segmentation masks, or video timestamps. image annotations tools have come a long way, some currently even support collaborative annotations where a team could work on the same dataset. for a list of the most used data annotation tools check here.
Another technology that makes image annotation much simpler is augmentation, data augmentation is the process of generating new data from present data by applying various augmentations to the present data such as random rotations, brightness and contrast changes, the presence of libraries made for augmentations make the process much easier, most of these libraries update the annotation files as well after applying the augmentations.
There are many formats for annotations, each used by different models and maps boxes in different ways, some of the popular formats are COCO, PASCAL VOC and YOLO.
Let’s have a scenario where you want to train a classification model on a single the image you have, if a model is trained with a single image it’ll usually perform very poorly, the solution, in this case, would be to acquire more data, since it’s a novel task, the data needs to be created manually, the steps I usually follow in creating datasets are:
This step is only possible when there is an image that contains many instances of an object, for example, an image of a highway, with the target class being cars.
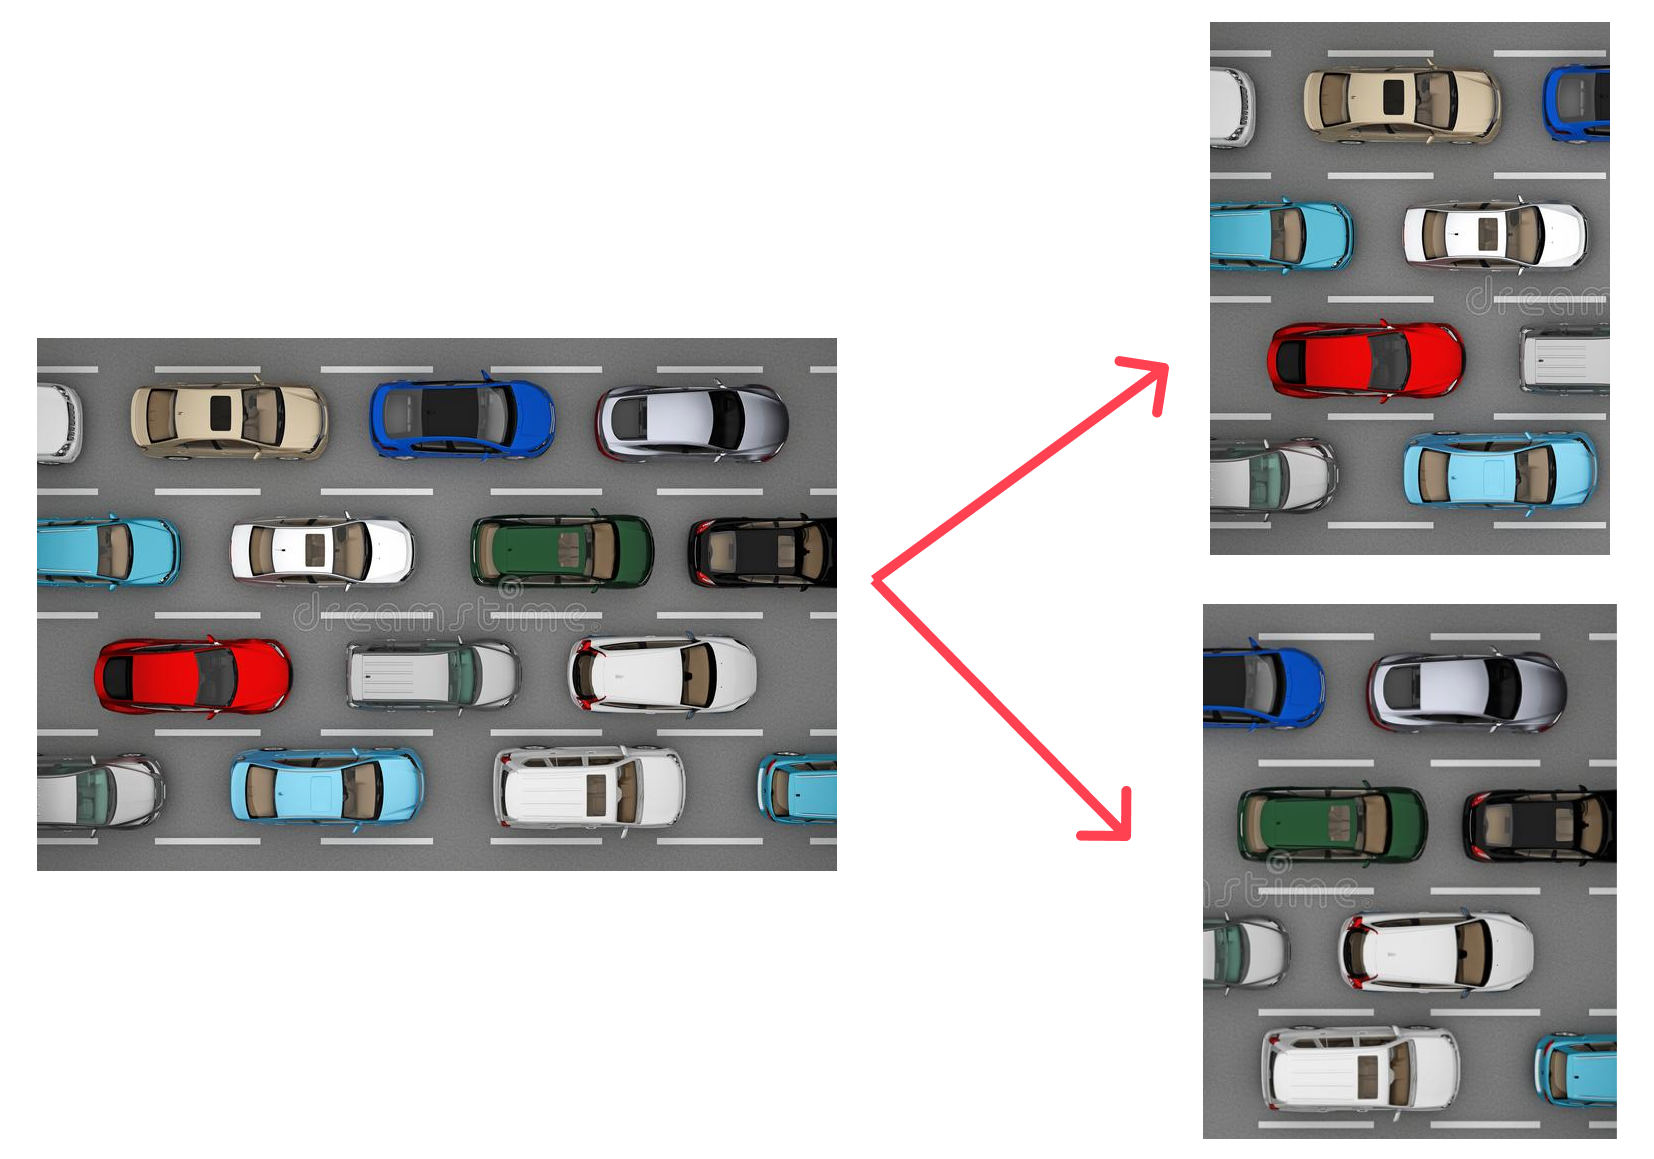
This will automatically double or quadruple the amount of data we have, now that we have more images we can proceed to annotate them. To automate this process, I have written a script, that given an image folder, will take any images there are split them into a grid of 4 images.
import glob
import os

from PIL import Image

def crop_image(image_path: str, num_rows: int, num_cols: int) -> None:
    """
    Crop image into num_rows * num_cols squares.

    Parameters
    ----------
    image_path: str
        Path to image to crop.
    num_rows: int
        Number of rows to crop to.
    num_cols: int
        Number of columns to crop to.
    """
    filename, file_extension = os.path.splitext(image_path)
    image = Image.open(image_path)
    img_width, img_height = image.size
    height = img_height // num_cols
    width = img_width // num_rows
    for i in range(0, num_cols):
        for j in range(0, num_rows):
            box = (j * width, i * height, (j + 1) * width, (i + 1) * height)
            a = image.crop(box)
            a.save(f"{filename}_{i}_{j}{file_extension}")

def main():
    # get all images in all 3 folders
    images = glob.glob("*.png") + glob.glob("*.jpg")
    for image in images:
        crop_image(image, 2, 2)

if __name__ == "__main__":
    main()
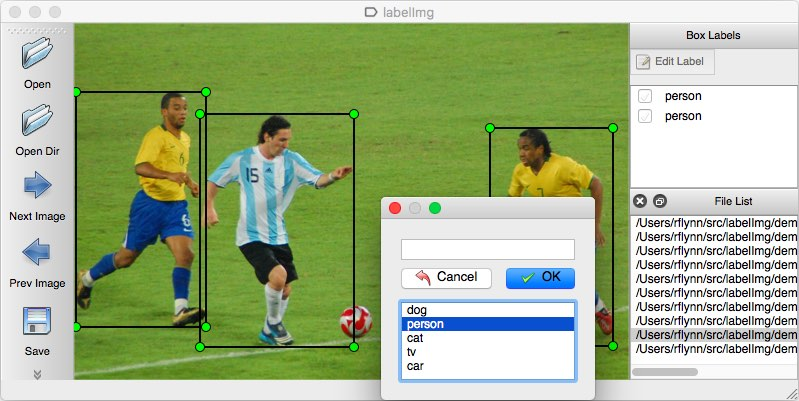
The image annotation tool I use is LabelImg, it’s very light and simple and does the task as expected. LabelImg supports mainly classification datasets, where you draw a box around an object and select its class from a set predefined prior.
The annotation process is as simple as drawing boxes around the images and choosing the class, LabelImg can export to yolo format which saves us time by not having to convert to yolo format.
After annotating the images, now we can augment them and create many more images, the augmentations library used is albumentations, because it preserves object placement when augmenting with augmentations specific to tasks such as classification and semantic segmentation. With augmentation, we can go from 1-10 images to 100s or 1000s with most of them retaining some objects thus usable for training. I wrote another script for this (as usual), the script will apply a predefined set of augmentations to images present in the folder with it, we can edit the script to change the augmentations and run the script again.
The script applies augmentations to the images then saves new images and annotations txt file in YOLO format to the appropriate places (train, test or validation).
"""
script to apply albumentations augmentations for bounding boxes annotated images
should be placed on the same folder with the dataset.
   |-test
   |-train
   |-valid
   |-aug.py
"""
import glob
from pathlib import Path
import random
import re
from typing import List

from PIL import Image
import albumentations as A
import numpy as np

def apply_augs(input: str, bboxes: List):
    """
    Apply augmentations to a given image

    Parameters
    ----------
    image: PIL.Image
        the image to augment.
    bbox: List[int]
        List of bounding boxes coordinates in yolo format.

    Returns
    -------
    Dict:
        dictionary containing the augmented image and bounding boxes.
    None:
        Returned when an error is encountered.
    """
    # albumentations expects the image to be an np array
    image = np.asarray(Image.open(input))
    # change these and run the script again to keep augmenting the images
    transforms = A.Compose(
        [A.RandomRotate90(p=0.3), A.RandomToneCurve()],
        bbox_params=A.BboxParams(format="yolo"),
    )
    # wrap in a try catch to avoid error
    # when specified crop size is larger than image size
    try:
        return transforms(image=image, bboxes=bboxes)
    except ValueError:
        print("ValueError: check your transformations")
        return

def main() -> None:
    # get all images in all 3 folders
    # (replace the first * with a folder name to only augment that specific folder)
    images = glob.glob("*/**/*.png") + glob.glob("*/**/*.jpg")
    for image in images:
        path_list = image.split("/")
        img_name = Path(image).stem
        bboxes_list = []  # to hold all coordinates in a file

        # extract boxes coordinates from annotations file
        labels_file = open(f"{path_list[0]}/labels/{img_name}.txt", "r").readlines()
        bboxes = list(map(lambda line: line.strip(), labels_file))
        for item in bboxes:
            coords = re.findall(r"\d+\.\d+|\b\d+\b", item[1:])  # find all numbers

            # convert to float to satisfy albumentations
            coords = list(map(lambda match: float(match), coords))
            # append the class as the final item
            coords.append(int(item[0]))
            # append current bbox coordinates to all coordinates in file
            bboxes_list.append(coords)
        transformed = apply_augs(image, bboxes_list)

        if transformed != None:
            aug_name = f"{path_list[0]}/images/{img_name}_aug_{random.randint(1, 100)}"
            # albumentations returns the image as a numpy array so convert accordingly
            Image.fromarray(np.uint8(transformed["image"])).save(f"{aug_name}.jpg")
            # convert returned coordinates list to string
            # and move the class back to the beginning of the line (yolo format)
            trans_labels = list(
                map(
                    lambda x: "".join(str(int(x[-1])))
                    + " "
                    + " ".join(map(str, x[:-1])),
                    transformed["bboxes"],
                )
            )
            trans_labels = "\n".join(trans_labels)
            tf_name = f"{aug_name.replace('images', 'labels')}.txt"
            with open(tf_name, "w+") as f:
                f.writelines(trans_labels)

if __name__ == "__main__":
    main()
Finally, we need to create a data.yaml file containing some information about the dataset as follows.
train: ./train/images
val: ./valid/images

nc: 2 # number of classes
names: ["Car", "Person"] # names of classes in order
the directory structure should look something like this for a YOLO dataset
.
├── data.yaml
├── test
│   ├── images
│   └── labels
├── train
│   ├── images
│   └── labels
└── valid
    ├── images
    └── labels
With that, now you should have a new dataset ready for training any model that utilizes the YOLO format (or any other if converted), for a guide on how to train a YOLO v5 model on your newly created dataset, checkout RoboFlow’s guide.
Data Science Project

Data Science Project
Data Science Project
Converting Jupyter notebooks to jekyll posts